
Teaching Measurement and Conversions
29 March 2021Showing students how to convert cups to gallons without watching them fill a measuring cup over and over and over.
By Dr. Jennifer M. Denlinger, CCC, CHEP
Teaching measurements and conversions is not an easy task. Even though students are familiar with the terms, they are not sure how the measurements are interchangeable. And there is nothing more painful than watching a student multiply out a recipe, then use a tablespoon to measure eight tablespoons worth of the same ingredient.
Conversions are extensively used for class since the textbook quantities are too large for making a class-sized portion. So, students must be very familiar with how to make the modifications.
I find that giving students a lot of practice exercises with conversions is best before they have it on their quizzes. I consider the practice low-stakes assessments. I also allow each student to make a cheat sheet. This helpful drawing is the only aid they can use on their tests besides scratch paper.
Illustrating conversations – graphically and in different vessels
As time allows in the kitchen lab, I give them dried rice or something similar. I hand out measuring cups and spoons, Cambros, ramekins and pitchers and allow them to use various methods so they understand the relationship of volume between different vessels.
Back in the classroom, I draw out a gallon conversion table on a whiteboard. This illustration also helps with the visual aspect of learning. To create the conversion graphic, I read out the instructions step by step. I also will create the graphic on the board with each step. I use as many different colored markers as I can. They follow along on their blank paper, and with colored pencils or crayons.
Here are the steps. Remember to use a different color marker, pencil or crayon for each step: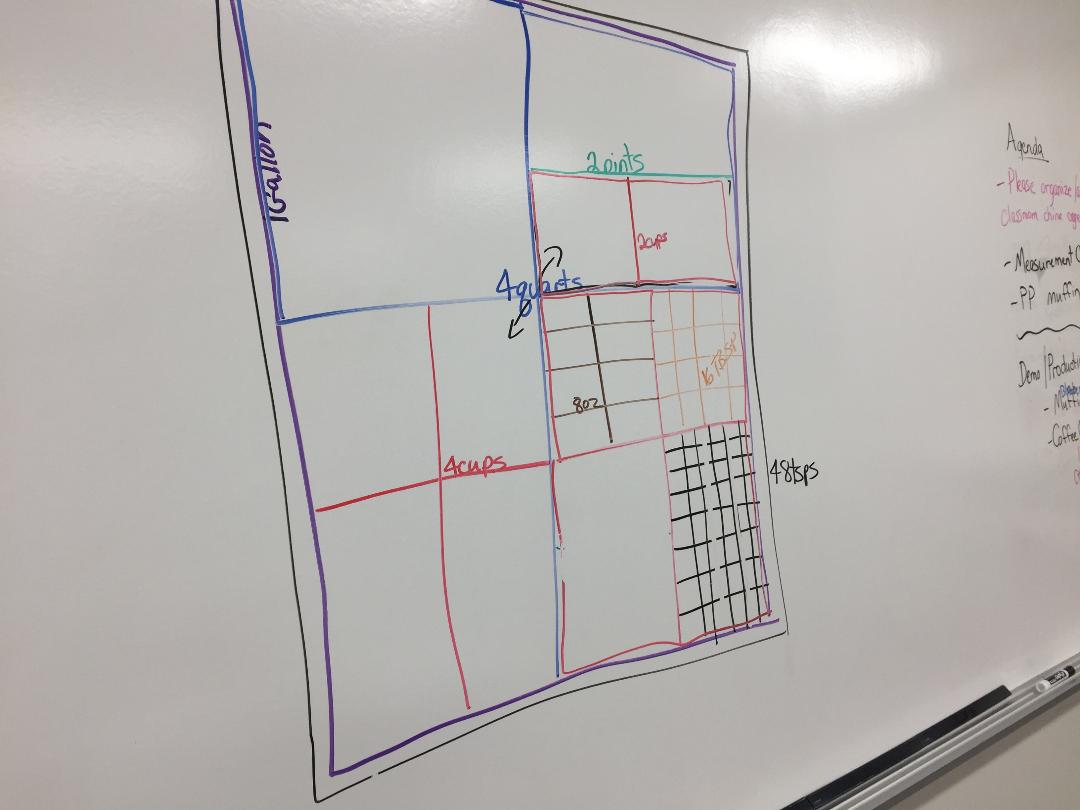
- Color 1 – draw a thick border around the page
- Color 2 – divide the box into four. You now have four quadrants.
- Color 3 – divide one of those quadrants in two.
- Color 4 – divide one of those boxes (color three) in two. Divide two quadrants in four. (You should still have one blank quadrant.)
- Color 5 – Pick one square in quadrant four and divide into eight.
- Color 6 – Pick one square in quadrant four and divide into 16.
- Color 7 – Pick one square in quadrant four and divide into 48. Leave one quadrant blank
After the drawing is complete, we go back and label all the squares.
- One gallon
- Four quarts
- Two pints
- Two cups
- Four cups
- Eight ounces
- 16 tablespoons
- 48 teaspoons
Click here for a PDF of the completed Gallon Conversion Table. Click here for a PDF of the instruction steps.
Sometimes, I will add a second graphic I call the Little Gallon Drawing. The uses only six quadrants labeled with G for gallon, Q for quarts, P for pints, C for cups, T for tablespoons and t for teaspoons. Students may draw this second graphic on the back side of the paper used to make the first drawing and use both graphics for tests. Click here to see the Little Gallon Drawing.
Chef Jennifer M. Denlinger, PhD., CCC, CHEP, is the Culinary Management Program Department Chair at the Poinciana Campus of Valencia College. She is also the vice president of ACF’s Central Florida Chapter. Additionally, Chef Denlinger earned the 2020 Innovation Award, sponsored by CAFÉ and the Idaho Potato Commission, for a creative escape room based on safe food handling procedures.