

Pate a Choux Lesson Plan, Part II
Super UserLast month, Chef Schmidtke, CMB, shared with you how to teach students to make pate a choux. Part two of the lesson plan deals with how to teach your students about pastry cream which will be used for filling the éclairs.
Before teaching about pastry cream, it is important to first talk about sanitation. Students must understand that the equipment must be very clean and sanitized before they begin working, they must also know the importance of cooling down the pastry cream in an ice bath once finished boiling.
To begin the lesson you will need the following ingredients to make a pastry cream that will be used to fill the éclairs:
1 QT of Milk 3 oz of cornstarch
1 oz butter
4 yolks
1 Vanilla bean
2 whole eggs
8 oz of sugar
To prepare the pastry cream, have the students mix the ingredients in the following manner:
Step 1. Take your milk with ½ the sugar plus the vanilla bean, split in half, and bring it to a boil.
Step 2. While the milk is on the stove whisk together the yolks, whole eggs, cornstarch and remaining sugar (make sure you whisk them well or your pastry cream will be very lumpy).
Step 3. Once the milk comes to a full boil, take it off the stove, then add the eggs / sugar and cornstarch mixture slowly while whisking constantly.
Step 4. Return the whole mixture back to the stove and bring the mixture to a boil. Let the students know that during this process the cream will go trough a lumping stage and that is a normal reaction of the cornstarch starting to thicken (a lot of times students think they did something wrong because it will look so lumpy, so they pull the pot of the stove thinking they made a mistake). I always tell my students to use low heat to prevent the pastry cream from burning, and constantly stirring the custard during the boiling process.
Step 5. Once the pastry cream has fully gelatinized, pull the pot of the stove and whisk in your butter.
Step 6. This is a good time to tell the students about the importance of cooling the pastry cream to prevent possible bacteria growth.
Step 7. After cooling of the pastry cream, it is important to whisk it until it is very smooth and lump free.
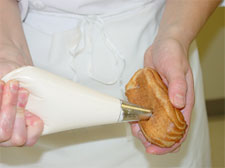
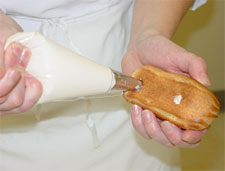
In the next phase of this lesson plan, the fun begins. It is now time to fill the éclairs with the pastry cream. Often times, students just put in a very small drop of pastry cream; it is important to tell them the reason for the nice hollow space inside the éclairs is to properly fill them with pastry cream.
That is why I always show my students how the properly fill the éclair. From the bottom I show them how to make two small holes with a small star tip and pipe the pastry cream into those two small holes.
|
|
|
Once all of the éclairs are filled properly, set them aside and prepare a chocolate Ganache. To make a Ganache you will need 1 pound of heavy cream and 1 pound of chocolate, and then follow the steps below:
Step 1: The best way for students to understand how to make a chocolate Ganache is to do a demo.
Step 2: Bring the heavy cream to a boil.
Step 3: Take the heavy cream of the stove and add the chocolate to the hot heavy cream. Cover with plastic wrap and let it sit for 3 minutes.
Step 4: Stir with a wooden spoon; if you use a whip you will incorporate too much air.
Step 5: Let the Ganache sit for about 15 minutes
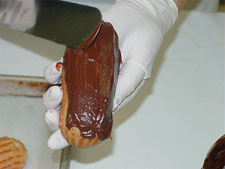
Step 6: Stir the Ganache and start dipping your éclairs. (I always tell my students to anticipate a little bit of run of from the Ganache, that’s why they should not dip the éclairs to deep). Any drips of chocolate will make the éclair look very sloppy.
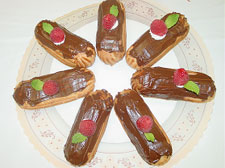
Step 7: Let the Ganache set fully on the éclair than decorate with very fine lines of white chocolate and one fresh raspberry in the center.
Step 8: Enjoy one, or even two yourself! Bon appetite!
|
|
|
Chef Manfred Schmidtke CMB teaches at the Florida Culinary Institute located in West Palm Beach, Florida. His passion for baking began as a little boy. At age eleven, he delivered freshly baked rolls and milk on his bicycle to people in a little town where he lived in Germany. His passion for baking led to trade school in Germany, which is the way that many Europeans are educated. After completing his apprenticeship with Mr. Karl Menke, Master Baker, he decided to broaden his horizons and traveled and worked in London, Rome, Sydney, Long Island, and Philadelphia. He owned his own European style bakery for a time in the suburbs of Pennsylvania known as the Four Seasons Bakery. His business was a success due to the hard work and support from his wife, family members, and friends. After five years in the baking business he decided to relocate to Florida where he discovered a talent for teaching. He teaches baking by having many “hands on” practical experiences for the students which enhance their educational experience in baking. He stays current on his baking expertise by attending conferences sponsored by the RBA and others. He became a Certified Master Baker in 1997.

Leave a comment
Make sure you enter all the required information, indicated by an asterisk (*). HTML code is not allowed.