I know everyone’s individual learning environment is as different as your budgets. This makes teaching culinary arts and all the information that comes with a degree or diploma challenging.
I have created a mock walk-in cooler activity that can be used as a demonstration or game, or to reinforce a lecture focusing on food storage and delivery. You can arrange the activity to reinforce storage requirements, final cooking temperatures or demonstrating first-in, first-out stock rotation. All you need are some boxes that represent mock food, storage shelves and a few index cards.
Activity items:
- Clean boxes, and lots of them! They need to be of various sizes and shapes. I used 20 boxes for my version. The previous contents do not matter as you are going to cover the outside with white paint. Be sure to get large and small boxes so you can nest them for storage when not playing the game.
- Two or three extra-large moving boxes or storage tubs
- Cheap white spray paint, and lots of it! I used nearly 10 cans
- Access to a color printer
- Optional: laminator for the pictures
- Clear packing tape or glue for attaching pictures to the boxes
- An Exacto knife or box cutter
- Five index cards and a permanent marker
- Mock storage shelves. If you have an empty metro shelf with five shelves, great! If not, you can use a rolling rack with five sheet pans or set up five classroom or kitchen tables
- If possible, a kitchen cart or dolly for “accepting the delivery”
Activity set up:
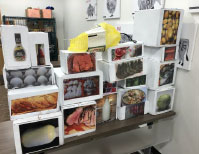 Using the box cutter, remove the box flaps so they are open on one side, in other words the boxes have five sides. (This makes the boxes handy for nesting and storing when not playing the game.) Take the boxes outside and turn them cut-side down and spray paint them white. They don’t have to be perfect, but essentially you want a blank palate. Do as many coats as needed and let them completely dry.
In the meantime, find pictures of foods you want to use. Try to represent different items that could go on all the different shelves. I used generic food or stock pictures. You will need to scale the pictures to fit the sides of the boxes. (Here’s my pro tip: I first printed my pictures in black and white to figure out which boxes to put them on and to properly scale them.)
Attach the laminated color pictures to the dry, white boxes making sure the box sits with its cut side down. (I laminated the pictures since my classroom area is usually very humid and I wanted them to last.)
Next, take the five index cards and make shelf labels. Attach each index card to an empty metro shelf or rolling rack. If you are using a classroom table, place one index card on each table.
(Another pro tip: Before you start the activity, take all the boxes and nest them for storage. I had three piles of nested boxes. The number of your piles may differ depending on the sizes and shapes of your boxes. I then took a large marker and labeled the inside of the boxes, from the top of the pile to the bottom, so when the activity is complete the boxes can be quickly nested in the proper sequence, for example 1A, 2A, 3A and 1B, 2B, 3B, etc. I also used the large moving boxes or tubs for storage.
Activity objective and instructions:
Randomly place the labeled boxes at the front of the classroom on tables or carts and then place the index cards on the corresponding shelf or table. Explain how the shelves are numbered. One example is the first shelf represents items that require no further cooking, the second shelf represents a final cooking temperature of 135 degrees or less, the third shelf is a final cooking temperature of 145 degrees or more, etc. Click here for a Mock Storage worksheet and photo of how the game is played.
Game version
Divide the class into two teams. Team one picks an item/box off the table and places it on the correct shelf. They receive one point if the placement is correct. If it is wrong, team two has the option of fixing it or taking a new item to put on a shelf. The instructor moves the wrong item back to the front of the classroom. It is now team two’s turn to choose a new food item/box. The game continues until all items are correctly placed on the shelves and the team with the highest points wins.
Learning or studying version
Each person in the class pickups up an item/box and places it on the proper shelf. After the whole class has gone and/or the entire product has been put on the shelves, the instructor removes all improperly placed items and puts them back on the table at the front of the classroom. The class continues to add or move product on the shelves until all the product is properly placed.
Activity addendums:
- A clipboard with receiving HACCP sheets
- A bimetallic stemmed thermometer
- Cryovac fake food for taking “mock temperatures”
- To practice first in, first out techniques, make multiple boxes of the same food item. Use sticky notes with mock dates written on them (instead of writing on the boxes) to determine which boxes should be used first.
Of course, the game can be altered to include your local health department rules and regulations, specialty situations you have with your purchasing, or maybe special storage options for local foods.
Chef Jennifer M. Denlinger, PhD., CCC, CHEP, is the Culinary Management Program Department Chair at the Poinciana Campus of Valencia College. She is also the vice president of ACF’s Central Florida Chapter. Additionally, Chef Denlinger earned the 2020 Innovation Award, sponsored by CAFÉ and the Idaho Potato Commission, for a creative escape room based on safe food handling procedures.